pyControl GUI
The pyControl GUI is a graphical interface for running experiments, configuring setups and visualising behaviour. The GUI is a tabbed window with Run task, Experiments and Setups tabs. The Run task tab controls one hardware setup at a time i.e. one pyboard and its connected hardware. It is designed for quickly prototyping tasks and testing hardware setups, but can also be used to acquire data from a single setup. The Experiments tab is used to configure and run experiments on multiple setups in parallel. The Setups tab is used to name and configure the hardware setups connected to the computer.
To run the GUI, run the file pyControl_GUI.pyw in the pyControl root directory.
Run task tab
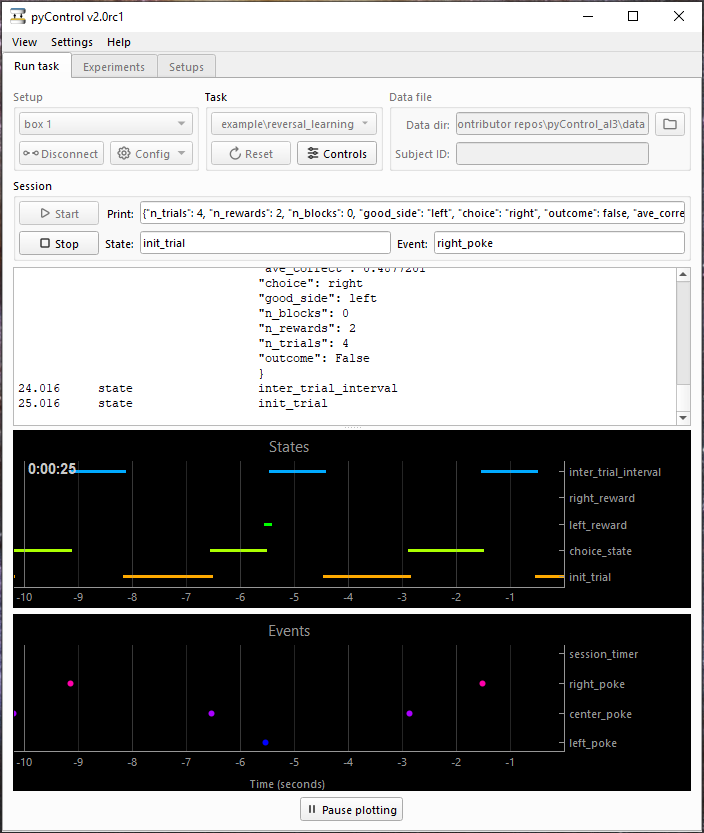
The run task tab consists of controls, a log text box and plot panels. See the Running a task section of the home page for a step-by-step guide to running a task. When a task is run, the output is printed to the log and the behaviour is plotted. If a valid data directory and a subject ID are provided, the Start button changes to Record and the GUI will save the data generated when the task is run.
The Setup control box is used to select a pyboard, connect and disconnect from the board, and configure the board. Pressing the config button brings up a menu with options detailed below in the board configuration section.
The Data file control box is used to select the directory where data files will be stored and to specify the ID of the subject. The filename is given by the subject ID and session start date and time.
The Task control box is used to select and upload a task and configure task variables. The tasks available in the drop-down menu are those in the folder pyControl/tasks. The tasks folder can be changed using the Settings menu. The upload button transfers the task file to the pyboard and sets up the task state machine. Once a task is uploaded the button changes to reset. Resetting the task returns it to its initial state as defined in the task definition file.
Task subfolders
Tasks can be organised into subfolders within the tasks folder, creating a nested list in the GUI drop down menu. This can be useful if you have a lot of tasks, e.g. to organise them by user.
The Controls button opens a dialog for setting/getting the value of task variables, adding notes to the data log, and manually triggering task events. It can be used either before a run starts or while a task is running. Variables must be defined in the task definition file using the v.my_variable syntax (see programming tasks). Variables can be set to numbers, or to Python objects including strings, lists and dictionaries. The constants ms, second, minute and hour can be used, e.g. a variable can be set to 30*minute. You can make task variables invisible to the GUI by ending their name in three underscores (e.g. v.my_private_variable___). Such 'private' variables work as normal in the task file but do not show up in the GUI. This can be useful if you have a lot of task variables, making it hard to find the ones you need to change in the GUI.
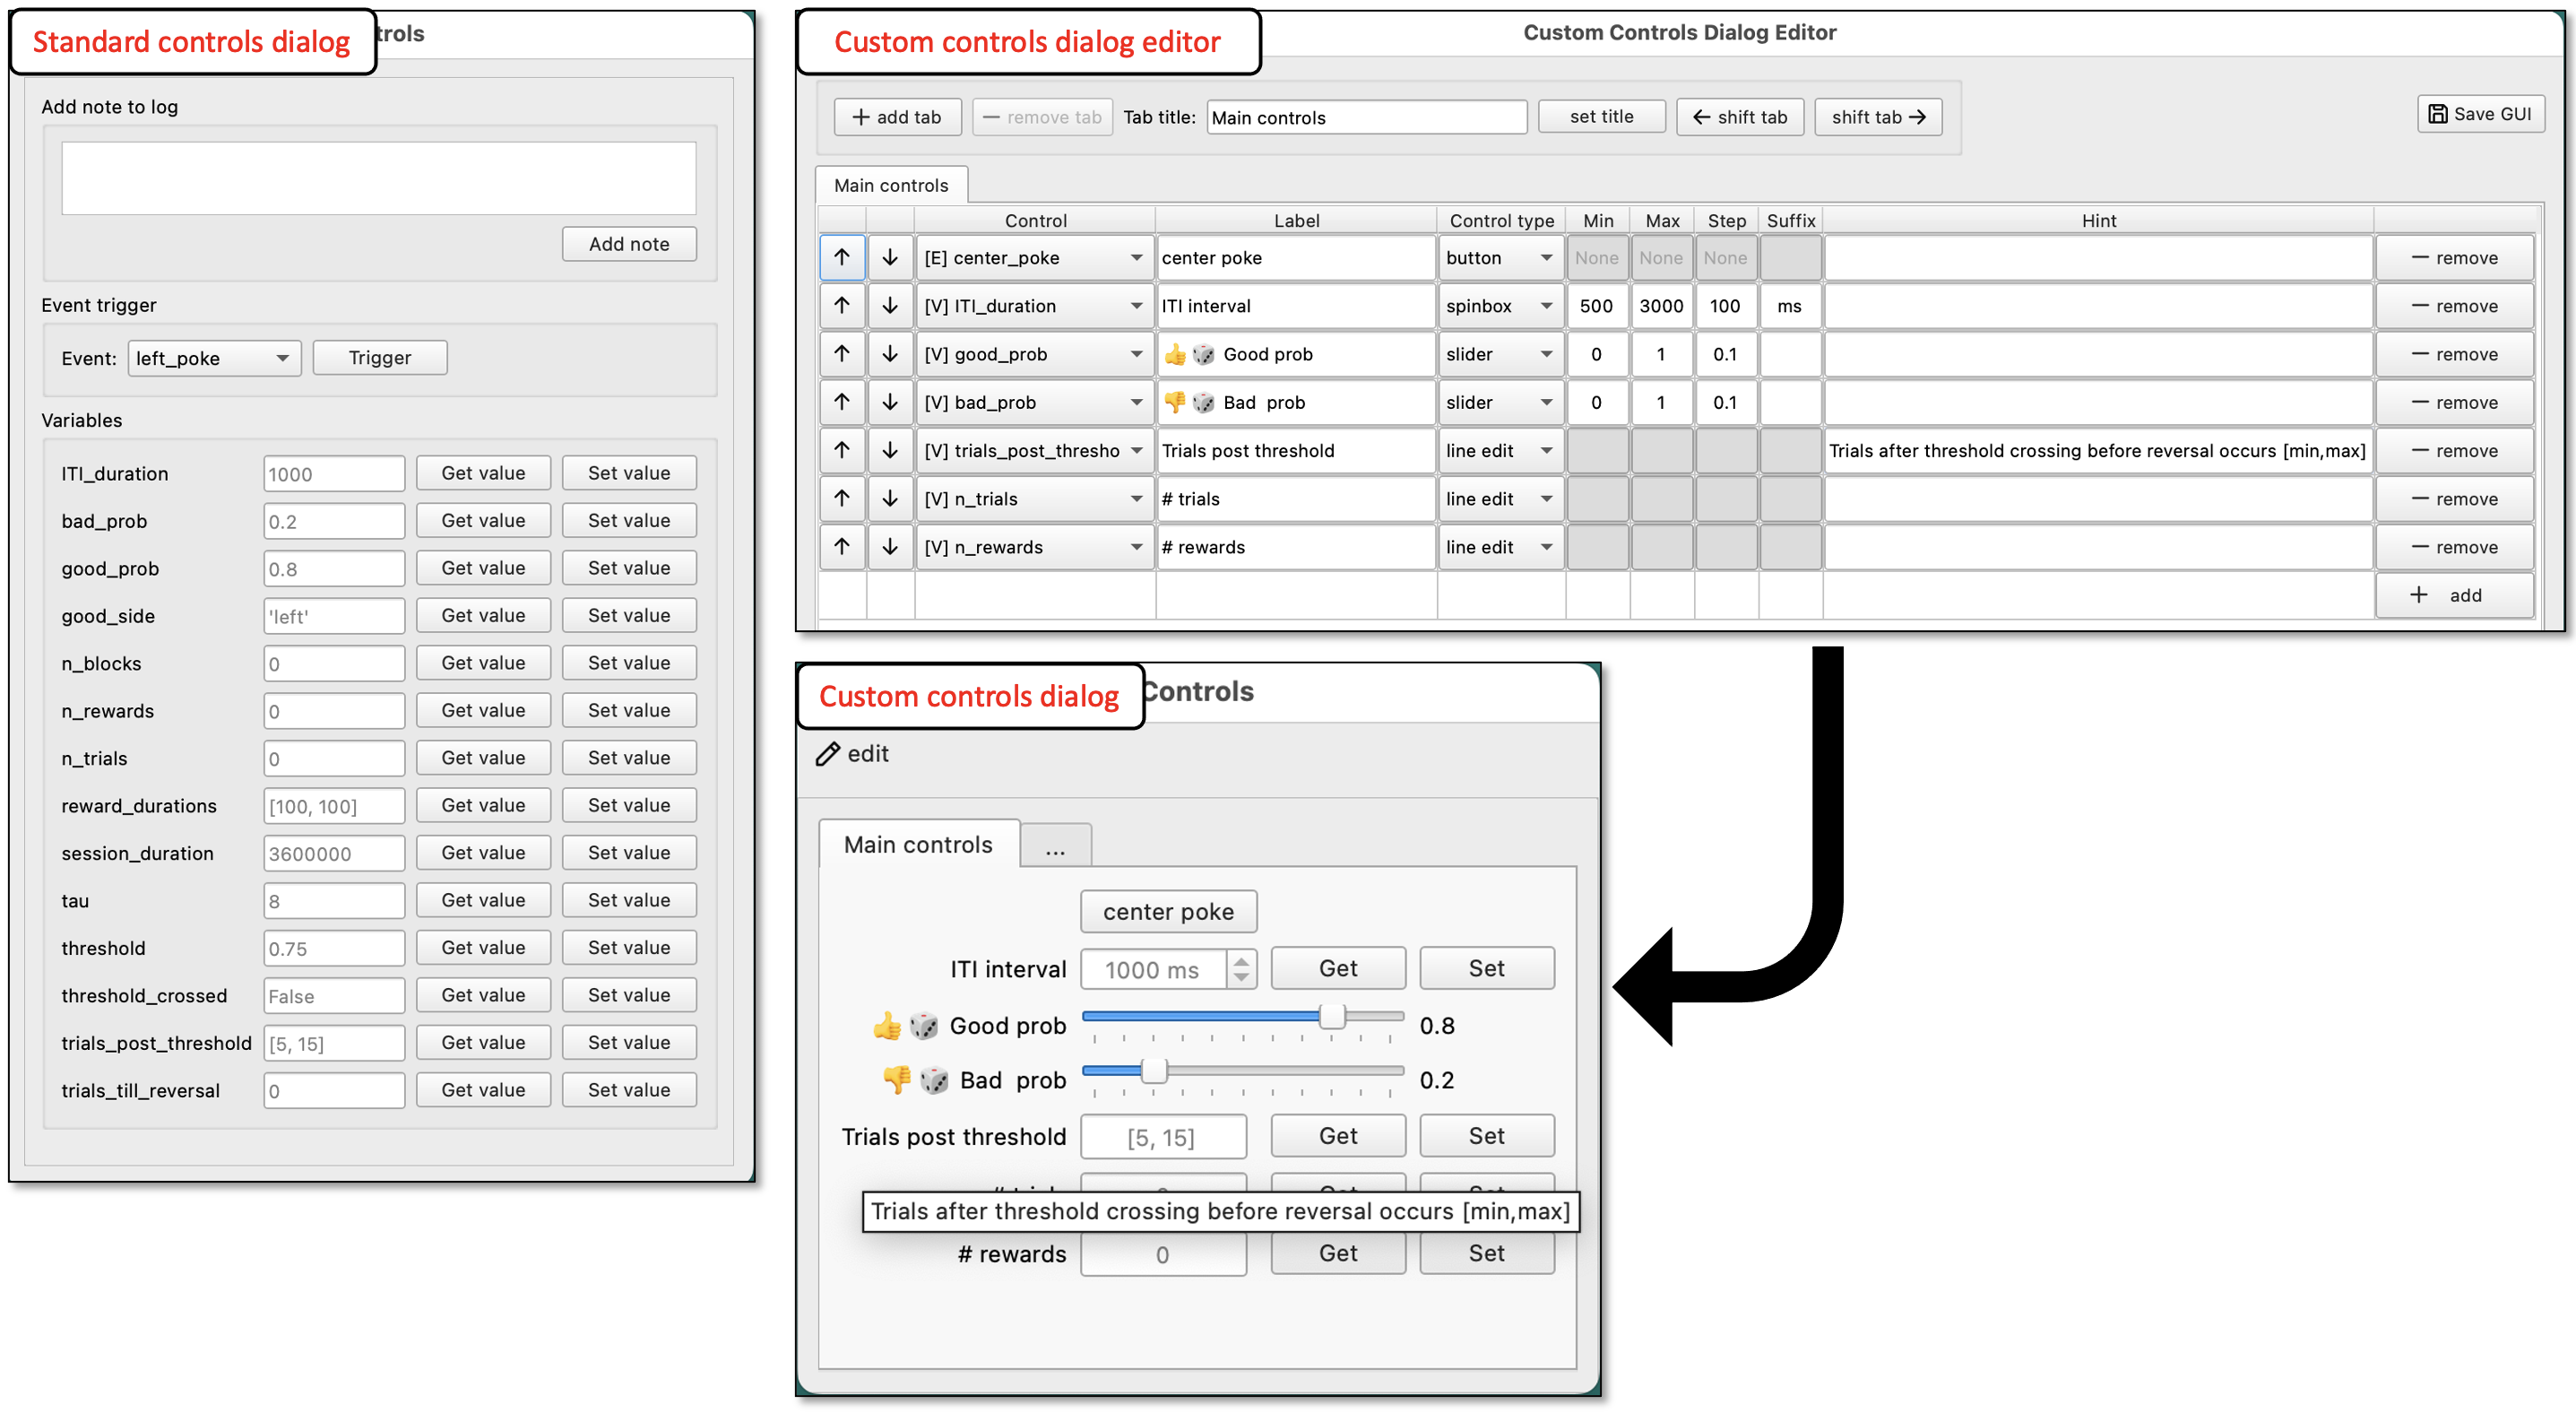
Controls dialog customization
The controls dialog can be customized by adding a v.custom_controls_dialog variable to your task file.
When a task with this variable is first uploaded, a prompt will ask if you want to create a new custom variable dialog.
An editor will appear that allows you to add and customize interactive controls (checkboxes, sliders, spinboxes etc.) for your task's variables.
The controls can be rearranged and organized into separate tabs, can have custom labels added, and can include hints that will appear when hovering over the control.
Any remaining variables that don't get assigned a custom control will automatically be placed in an extra "..." tab.
Custom controls dialogs can be modified by opening the controls dialog in the Run task tab when the task is not running and pressing the edit button.
This feature can be useful for tasks that have many variables that you would otherwise have to scroll/search through and type in edits for. The included example/custom_controls_dialog.py task is a good reference for this feature that can be viewed and run on any setup.
Experiments tab
The experiments tab is used to configure, save, load and run experiments on one or more hardware setups at the same time. An experiment is a set of subjects, each with a corresponding hardware setup, run on the same task, with variables optionally set to non-default values for some or all subjects. When you run an experiment you can run all subjects, or select only a subset to run, and can start and stop different subjects at different times.
Configuring experiments
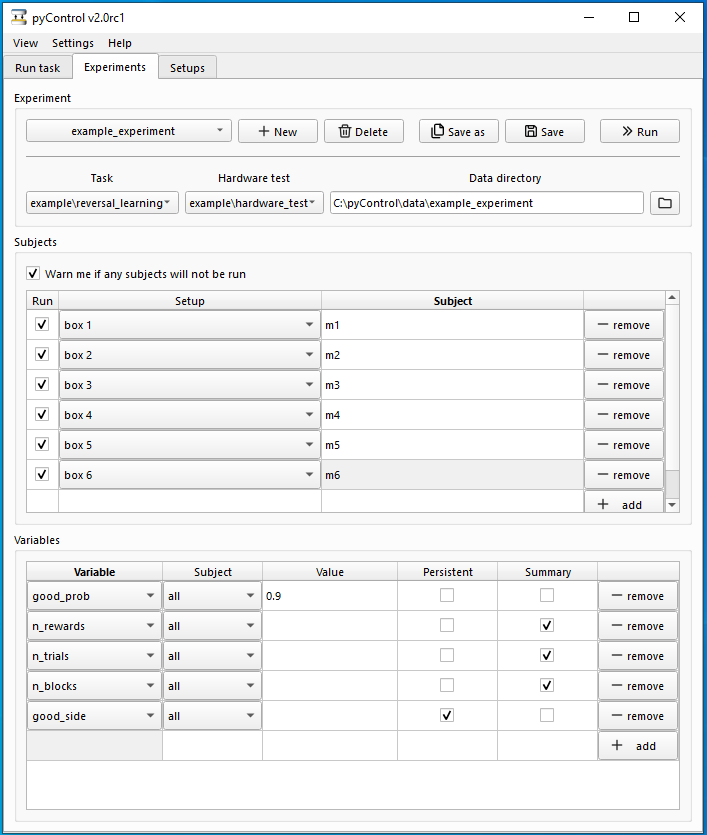
When the experiments tab is opened it shows the configure experiment dialog. To create an experiment, click the new button and name a new experiment file within the experiments folder. Next select a task that will be run for all of the subjects. By default, data generated by the experiment will be saved in a folder pyControl/data/experiment_name, but the data folder can be changed using the data directory control.
Experiment subfolders
Experiments can be organised into subfolders within the experiments folder, creating a nested list in the GUI drop down menu. This can be useful if you have a lot of experiments, e.g. to organise them by user.
An optional hardware test can be specified for the experiment. The hardware test is a task that is run before the main task, allowing the user to check whether the hardware is working as intended. The hardware test can be the same task as that used for the experiment, or another task designed specifically to test the hardware. No data is saved during the hardware test.
The Subjects table is used to specify which subjects will run in which hardware setups. To add a subject to the experiment, press the add button, select the setup and enter a name for the subject. The Run checkbox determines whether on not a particular subject will be run when the experiment is run. You can assign multiple subjects to the same setup in the variables table but can only run a single subject on a given setup at a time.
The Variables table is used to set the value of variables before the task starts. Variables can be set to the same value for all subjects or to different values for different subjects. Variables can be set to numbers, or Python objects including strings, lists and dictionaries. The constants ms, second, minute and hour can be used, e.g. a variable can be set to 5*second.
A variable can be set as persistent by ticking the persistent checkbox. If a variable is persistent it's value is saved at the end of the session. The next time the experiment is run, if the variable is still set as persistent, its value will be set to the previously stored value. Persistent variables are saved as a JSON object in a file persistent_variables.json in the experiments data folder. JSON is a human-readable format so the stored values can be inspected and edited using a text editor. If a value is entered in the variables table for a persistent variable, the table value will take precedence over the stored value and a message will indicate this when the experiment is run.
Summary variables can be specified by ticking the summary check-box. The values of summary variables are displayed for each subject at the end of the session and copied to the clipboard in a format that can be pasted directly into spreadsheets or text editors.
The save button saves the current experiment configuration. Saved experiments can be loaded by selecting them with the drop-down menu. Saved experiments can be deleted with the delete button. Each experiment is saved as a separate file in the folder pyControl/experiments. Experiment configurations are saved as JSON objects in text files with a .pcx file extension.
Running experiments
To run an experiment, press the Run button on the configure experiments tab. This changes the experiments tab from the configure experiment interface to a run experiment interface:
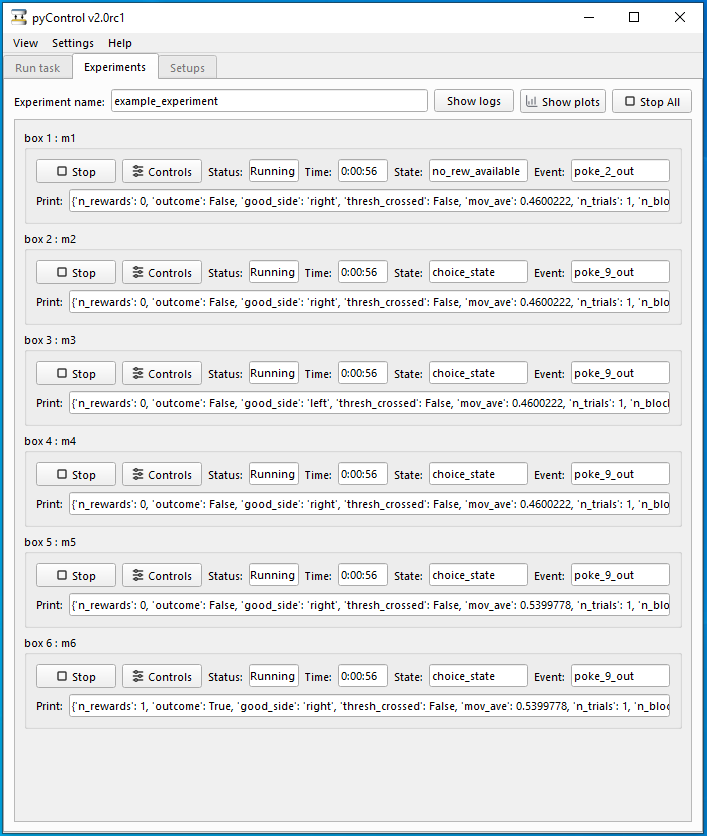
The GUI will connect to the setups and upload the task. Once the task is loaded on all the boards the Start all button and Start buttons for individual subjects will become available.
While the experiment is running, data from each setup is shown in a separate box. This shows the current state, the most recent event, the most recent line printed, and a log of output generated by the task. The variables button brings up a dialog to set or get the value of task variables for that subject.
The Hide logs button hides the log textboxes for all subjects, leaving the summary data (current state, most recent event and print) and buttons, to fit more setups on screen simultaneously.
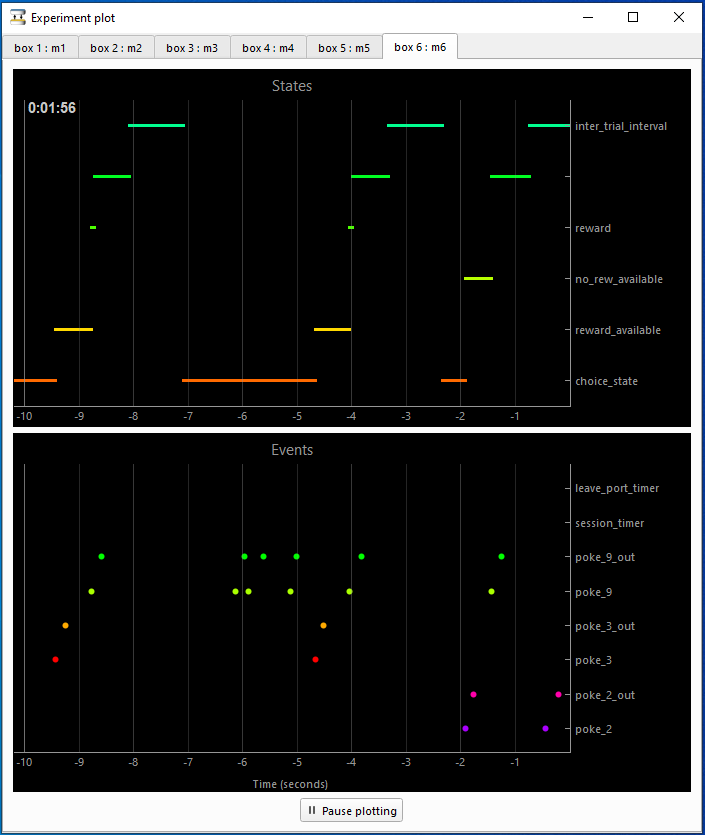
The Show plots button opens a tabbed window where the behaviour of each subject can be visualised. Plots for each subject can be popped out into separate windows by dragging or double-clicking their tab.
Setups tab
The setups tab is used to name and configure hardware setups.
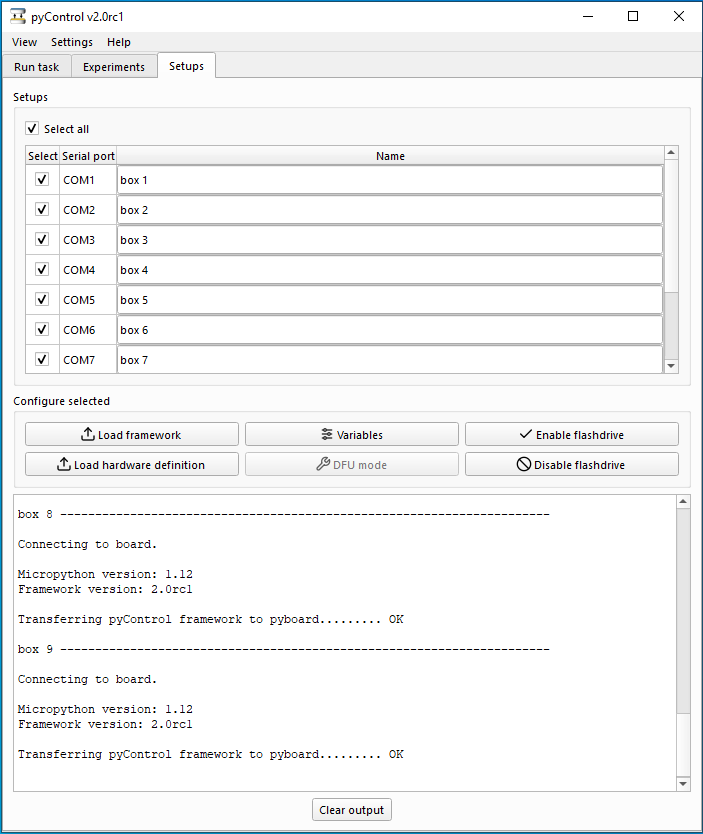
If a name is specified for a setup, the name will appear instead of the setup's serial port in the board select drop down menu in the Run task and Configure experiment tabs. If you have pyboards connected to your computer that are not pyControl setups (e.g. pyPhotometry systems), you can hide them from appearing in the board select drop down menus by naming them _hidden_ in the Setups tab.
To configure setups, select the setups to be configured using the Select checkboxes then use the buttons below to configure the setups.
Board configuration options
- Load framework: Reload the pyControl framework onto the board. If you are using a hardware definition you will need to reload it after loading the framework.
- Load hardware definition: Load a hardware definition file onto the pyboard.
- Device Firmware Update (DFU) mode: Put the pyboard into DFU mode used for upgrading the version of MicroPython running on the board. For more information on upgrading MicroPython see here.
- Enable/disable USB flash drive: Disabling the USB flash drive prevents the pyboard from showing up on the computer's filesystem as a USB storage device. It is recommended to disable the flashdrive on pyboards used for pyControl as this improves the reliability of file transfers to the board using the GUI.
- Variables: The variables button opens a dialog for setting the value of hardware variables. These are variables defined in task files with names that start with
hw_(e.g.v.hw_my_hardware_variable) which are typically used for hardware calibration variables such as solenoid valve opening times. If you have any such variables defined in your task files they will be available for selection in the hardware variables dialog where you can enter values for each setup.
GUI settings
Settings can be adjusted by going to Settings→Edit settings or pressing Ctrl + ,