Programming tasks in pyControl
Overview
Behavioural tasks in pyControl are implemented as state machines, the basic elements of which are states and events. To implement a task the user creates a task definition file written in Python.
Task definition files run directly on the MicroPython microcontroller, not on the computer. Python modules such as Numpy that are installed on the computer will therefore not be available in the task definition. For a list of the modules available in MicroPython see the MicroPython docs.
Example task definition files are provided in the tasks/example folder. To give a flavour for what task files look like, this is the code for the button example task:
from pyControl.utility import *
from devices import *

# Define hardware (usually done in a seperate hardware definition file).

button = Digital_input('X17', rising_event='button_press', pull='up') # pyboard usr button.
LED    = Digital_output('B4') # pyboard blue LED.

# States and events.

states = ['LED_on',
          'LED_off']

events = ['button_press']

initial_state = 'LED_off'

# Variables

v.press_n = 0

# State behaviour functions.

def LED_off(event):
    if event == 'button_press':
        v.press_n = v.press_n + 1
        print('Press number {}'.format(v.press_n))
        if v.press_n == 3:
            goto_state('LED_on')

def LED_on(event):
    if event == 'entry':
        LED.on()
        timed_goto_state('LED_off', 1*second)
        v.press_n = 0
    elif event == 'exit':
        LED.off()
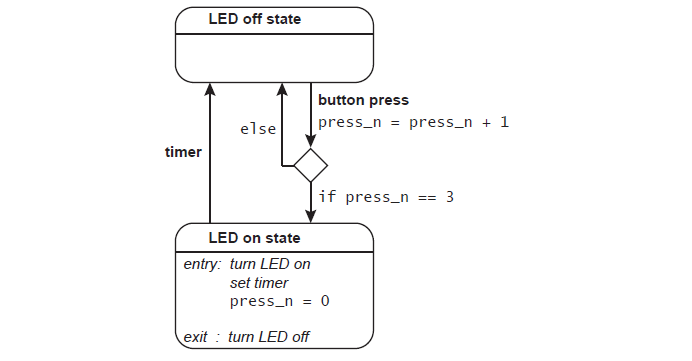
The above code implements the state machine shown in the diagram below. The task starts in an LED_off state. Each time the pyboard usr button is pressed the variable v.press_n is incremented by 1. When the button has been pressed 3 times the task transitions to an LED_on state, on entering this state the pyboard blue LED is turned on, the v.press_n variable is set to 0, and a timer is set to trigger a transition back to the LED_off state after 1 second. On exiting the state the LED is turned off.
Imports
Every task definition file starts by importing a set of pyControl specific functions and variables contained in the pyControl.utility module. These are typically imported as:
from pyControl.utility import *
If you are using a hardware definition file to specify external hardware you also need to import the hardware definition:
import hardware_definition as hw
Alternatively, if you want to instantiate hardware directly in the task file you can import the hardware classes directly with:
from devices import *
See the hardware docs for more information about defining hardware used in a task.
The from module import * syntax imports the contents of the module directly into the namespace of the task definition file, so e.g. to use the goto_state function contained in the pyControl.utility module you simply write goto_state in the task file. This is not generally considered good practice in Python programming because it can create ambiguity about which function comes from which module, and can cause collisions where imported functions overwrite those already defined if they have the same name (see discussion here). An alternative is to import modules under a specific name and then access their contents as attributes:
import pyControl.utility as pc # Import the pyControl.utility module and give it the name pc

pc.goto_state('state_A') # Call the goto_state fuction from the pyControl.utility module.
We typically use from pyControl.utility import * as we think it results in a cleaner task file syntax, and given the simplicity of typical task file imports, name collisions are unlikely to cause problems in practice. You can use whichever import style you prefer. The example tasks folder contains a version of the button example using * imports and a version using named imports, so you can compare the resulting code.
States
The state machine has a set of states defined by the user, and at any point in time it is in one of these states. The set of states is defined by a variable called states which is a list of state names:
states = ['state_A', 'state_B']
The state the machine starts in must be specified by setting a variable called initial_state to the name of the initial state:
initial_state = 'state_A'
Events
Events cause the state machine to do things, they may be generated externally by hardware inputs or internally by setting timers or publishing an event. The user specifies the events used by the state machine by creating a variable called events which is a list of event names.
events = ['event_A, event_B']
Events generated by external inputs must have the same name in the task file as was specified when the input was instantiated. E.g. if in your hardware definition you have:
button = Digital_input(pin='X1', rising_event='button_press')
Then for your task to respond to events generated by the button you need to include the event 'button_press' in the task's events list. Hardware inputs whose events are not specified in the events list are not active when the task is run and will not generate events.
It is recommended to give events that will be triggered by internal timers names that end in '_timer', e.g. 'stimulus_timer'. Although timers will work with any event name, this convention makes task code more readable.
State behaviour functions
The behaviour of the state machine is defined by writing a set of state behaviour functions, each of which defines the behaviour of one state. The name of the function must be the same as the name of the state whose behaviour it defines, and the function must take a single argument called event. When an event occurs the function corresponding to the current state is called with the event that occurred as an argument. For example if 'event_A' occurs when the state machine is in 'state_A', the function state_A is called with 'event_A' as an argument. State behaviour functions usually consist of a set of if / elif statements which determine what happens when different events occur.
def state_A(event):
    if event == 'event_A':
        # do something.
    elif event == 'event_B':
        # do something else.
Any valid MicroPython code can be put in state behaviour functions, though the code should execute fast as it will block any other behaviour of the state machine while it is executing.
Changing state
The function goto_state tells the state machine to transition to the state whose name is provided as an argument.
goto_state('state_B')
When a state transition occurs two special events called 'exit' and 'entry' are generated. The 'exit' event is evaluated in the state that is being exited, while the 'entry' event is evaluated in the state which is being entered. These events allow code to be executed every time a state is entered or exited, irrespective of the event that triggered the state transition. Example usage:
def state_A(event):
    if event == 'entry':
        # Code here executes when state_A is entered.
    elif event == 'exit':
        # Code here executes when state_A is exited.
Calling goto_state in response to an 'entry' or 'exit' event will cause an error because the state machine is already in transition to a new state when these events occur.
It is strongly not recommended to put any code in a state behaviour function that executes after a goto_state because it will be executed following the state transition when the task is in the subsequent state, potentially causing hard to identify bugs.
Time dependent behaviour
The simplest way to implement time dependent behaviour is using the timed_goto_state function. This tells the state machine to transition to a specified state after a specified interval has elapsed.
timed_goto_state('state_C', 10*second) # Transition to state 'state_C' after 10 seconds.
If a state transition occurs for any reason before the timed_goto_state triggers, the timed_goto_state is cancelled and will have no effect.
Timers provide a more flexible way of implementing time dependent behaviour by allowing a specified event to be triggered after a specified time has elapsed.
set_timer('event_A', 100*ms) # Trigger event 'event_A' after 100 ms.
Timers generate the specified event regardless of whether the state machine has changed state since the timer was set. You can set multiple timers for the same event, for example the following code will set two timers, causing event_C to occur twice, once after 1 second and once after 3 seconds have elapsed.
set_timer('event_C', 1*second)
set_timer('event_C', 3*second)
The constants ms, second, minute, and hour can be used as in the examples above.
The function disarm_timer disarms all active timers which are due to generate the specified event.
disarm_timer('event_A')
The function reset_timer disarms all active timers due to generate the specified event and sets a new timer to generate the specified event after the specified duration.
reset_timer('event_A', 50*minute)
The function pause_timer pauses, and the function unpause_timer unpauses, all timers set to generate the specified event. When a timer is paused the time remaining until the event is generated is stored, then when it is unpaused it is restarted with the remaining time. For example if a timer is set for 5 seconds, then paused after 3 seconds, when it is unpaused it will have 2 seconds remaining till the event is generated.
pause_timer('event_A')

unpause_timer('event_A')
The function timer_remaining returns the time in ms until a timer set for the specified event elapses, and returns 0 if no timer is set for that event.
timer_remaining('event_A')
The get_current_time function returns the number of milliseconds since the framework started running.
x = get_current_time()
Run start and end behaviour
Code can be executed when the framework starts or stops running by defining the following functions in the state machine description:
def run_start():
    # Code here is executed when the framework starts running.

def run_end():
    # Code here is executed when the framework stops running.
The framework can be stopped from within a task file by calling the function:
stop_framework()
When the framework is stopped in this way, the run_end function will be called as usual. The typical use of stop_framework is to stop the framework at the end of the behaviour session, dependent on a timer or criterion such as the number of rewards delivered.
State independent behaviour
The all_states function can be used to implement behaviour which occurs irrespective of the state the task is in. Combined with timers and variables, the all_states function is a powerful tool for making things happen in parallel with the main state set of the task. For a simple example of this see the all_states_example task.
If the all_states function is defined, it will be called every time an event occurs with the event that occurred as an argument.
def all_states(event):
    # Code here will be executed when any event occurs,
    # irrespective of the state the machine is in.
After the all_states function has executed the state behaviour function for the current state will be executed. To block execution of the current state's behaviour function make the all_states function return True.
def all_states(event):
    # Code here will be executed when any event occurs,
    # irrespective of the state the machine is in.
    if condition:
        return True # If condition is True, the current state's
                    # behaviour function will not be executed.
Variables
Variable names should start with v., for example:
v.variable_A = 0.5
Variables are referenced in state behaviour functions using the same syntax:
def state_A(event):
    if event == 'event_A':
        if v.variable_A > 0.3:
            # do something
        else:
            # do something else.
Starting all variable names with v. makes all variables attributes of a single object called v (imported from pyControl.utility). This avoids problems that could otherwise occur when variables are accessed or set in state behaviour functions due to these functions having their own namespaces. It also allows the GUI to access the variables to set or get their values.
Special variables
You can make task variables invisible to the GUI by ending their name in three underscores, for example v.my_private_variable___. Such 'private' variables work as normal in the task file but do not show up in the GUI. This can be useful if you have a lot of task variables, making it hard to find the ones you need to change in the GUI.
A custom controls dialog can be specified by adding a v.custom_controls_dialog variable. See controls dialog customization for more details.
Variables associated with hardware setups (e.g. calibration data for solenoid valves) can be used within a task by including a variable that begins with "hw_" for example v.hw_my_hardware_variable.
Once a hardware variable (any variable beginning with "v.hw_") has been established in a task file, the hardware specific value can be assigned to a hardware setup by going to the Setups tab, checking the named hardware setups that you want to assign values to, and then clicking the Variables button.
An "Edit Hardware Variables" dialog will appear.
From the hardware variable dropdown, select a variable and fill in the setup-value table below and finish by clicking the save button in the bottom right corner.
The included example/hardware_setup_level_variable.py task is a good reference for this feature that can be viewed and run on any setup.
Adding v.api_class will provide a two-way application programming interface (API) between the task running on the microntroller and a custom Python script running on the PC. See API for more details
API
An interface between the microcontroller task logic and the desktop computer during a running task can extend the capabilities of pyControl. For instance, it can be useful to offload intensive computations onto the more capable PC and then send the results back down to the microcontroller. Or you may want pyControl to connect to and communicate with external programs such as Bonsai or PsychoPy. The included example/api.py task is a good reference for this feature that can be viewed and run on any setup.
Data output
Whenever an external event occurs it is output to the data log along with a timestamp. Whenever a state transition occurs the state that is entered is output with a timestamp. Events triggered by timers are output to the data log by default, but you can prevent this by setting the output_event argument to False when setting the timer:
set_timer('event_A', 3*second, output_event=False)

reset_timer('event_B', 3*second, output_event=False)
The print() function can be used in task definition files to print a string to the data output along with a timestamp.
print('Hello world')
A print_variables function can be used to output the value of task variables to the data log along with a timestamp. By default it prints the value of all task variables but you can also specify a subset of variables to print by providing a list of variable names:
print_variables() # Print the value of all task variables.

print_variables(['n_trials', 'n_rewards']) # Print the value of task variables v.n_trials and v.n_rewards.
Variables are written to the data file as a JSON formatted string as this both human-readable and easy to parse in most programming languages, e.g. in python using the JSON module. In decision making tasks it is often sensible to print the value of task variables once each trial, as done in the reversal_learning example.
Structuring task files
As pyControl task definition files are just Python modules, you can define arbitrary functions that can be called from within state behaviour functions. A useful application of this is to separate code that defines the behaviour of the state machine from code which implements other aspects of the task, such as block structure or stimulus selection. Organising task code in this way is recommended as it makes task definitions easier to understand and maintain. The reversal_learning example uses this structure.
Writing performant task code
The following dos and don'ts are good practice for ensuring that tasks run stably and respond to input with low latency:
- Avoid polling: Polling is the process of regularly checking the state of an input to detect when to do something. It is rarely the right thing to do in pyControl tasks, as polling an input at high frequency ties up processor time which could affect framework performance. For digital inputs it is always preferably to detect changes in the state of the input using framework events generated on rising and/or falling edges by the Digital_input class, as no resources are used except when the change actually occurs. For analog inputs, where possible use the Analog_input's ability to generate framework events when a specified threshold is crossed rather than polling the value of the input. Polling may be necessary if you need to respond to events send over a serial connection (e.g. from an external device that communicates via UART). In this case either poll at the lowest frequency necessary to ensure an acceptable response latency to the serial input, or if possible trigger the serial read using a separate digital input from the external device.
- Input debouncing: By default, pyControl digital inputs implement debouncing which prevents edges occurring closer together than a specified threshold (default 5ms) from generating multiple framework events. For inputs generated by sensing physical processes (e.g. a switch closing or IR beam break), this is usually what you want, as the edges generated may be ragged, causing multiple logic level threshold crossings on a single physical event. However debouncing incurs some additional processing cost when edges occur, so should be turned off on digital inputs that will receive events at high rates with clean edges (e.g. from a camera on each frame of a video), by using the argument
debounce=Falsewhen the digital input is instantiated. - Garbage collection MicroPython has a garbage collector which runs when needed to free up memory by removing variables that are no longer in use. Garbage collection takes several ms to run and events generated by external inputs or expiring timers that occur during garbage collection will be processed once it has finished. If an occasional delay of a couple of ms would be an issue in your task, it is possible to manually trigger garbage collection at a time when it will not cause problems (e.g. in the inter-trial interval). To do this, import the garbage collection module into the task file with
import gcand call garbage collection withgc.collect().
Function reference
The functions and classes detailed below are contained in the pyControl.utility module.
State machine functions
goto_state
goto_state(next_state)
Transition to state next_state. An 'exit' event is processed in the state that is being left, and an 'entry' event is processed in the state that is being entered.
Example usage:
goto_state('state_A') # Transition to state 'state_A'
timed_goto_state
timed_goto_state(next_state, interval)
Transition to state next_state after interval milliseconds have elapsed. The current state will behave as normal till the state transition occurs. 'entry' and 'exit' actions will be processed when the state transition occurs as with goto_state. If a state transition occurs for any reason before the timed_goto_state triggers, the timed_goto_state is canceled and will have no effect. Constants ms, second, minute and hour can be used in specifying the interval as shown in an example below.
Example usage:
timed_goto_state('state_B', 100*ms)    # Transition to state 'state_B' after 100 ms

timed_goto_state('state_C', 10*second) # Transition to state 'state_C' after 10 seconds.
set_timer
set_timer(event, interval, output_event=False)
Set a timer to trigger the specified event after interval milliseconds have elapsed. When a timer is set it will trigger the specified event at the specified time irrespective of any state transitions that have occurred after it was set, unless it is disarmed or reset using disarm_timer or reset_timer (see below). The event triggered by the timer is only recorded in the data output if the output_event argument is set to True.
Example usage:
set_timer('event_X', 5*second) # Trigger event 'event_X' after 5 seconds
disarm_timer
disarm_timer(event)
Disarm any timers due to trigger specified event. The events that would have been generated by the disarmed timers will not be generated.
Example usage:
disarm_timer('event_X') # Disarm all timers set to trigger event 'event_X'
reset_timer
reset_timer(event, interval, output_event=False)
Disable any timers due to trigger specified event and set new timer to return specified event after interval milliseconds have elapsed. The event triggered by the timer is only recorded in the data output if the output_event argument is set to True.
Example usage:
reset_timer('event_X', 5*minute) # Disable any timers due to trigger event 'event_X' and
                                 # set a timer to trigger 'event_X' in 5 minutes.
pause_timer
pause_timer(event)
Pause any timers due to trigger specified event. While a timer is paused the timer remaining till it elapses does not decrease.
unpause_timer
unpause_timer(event)
Unpause any timers due to trigger specified event. When a timer is unpaused it restarts with the same time remaining as when it was paused.
timer_remaining
timer_remaining(event)
Return the time in ms until a timer set to trigger the specified event elapses, returns 0 if no timer is set for event.
get_current_time
get_current_time()
Returns the number of milliseconds since the framework started running.
publish_event
publish_event(event)
Trigger the specified event. The principal use case is to generate an event in the data output to log when something important has happened.
print
print(print_string)
Print print_string to the data output. Printed strings are given a timestamp so that the time the print statement was executed is recorded in the data file.
print_variables
print_variables(variables='all')
Print the specified variables to the data output as a JSON formatted string along with a timestamp. By default the value of all task variables are printed, but a subset of variables can be printed by providing a list of variable names as an argument.
stop_framework
stop_framework()
Stop the framework running.
Random functions and classes
Functions and classes for random number generation.
random
random()
Return a random float between 0 and 1.
withprob
withprob(p)
Return a random boolean that is True with probability p.
shuffled
shuffled(L)
Return a shuffled copy of list L.
choice
choice(L)
Return a randomly selected element from list L.
randint
randint(a,b)
Return a random integer N such that a ≤ N ≤ b.
exp_rand
exp_rand(m)
Return a random number drawn from an exponential distribution with mean m.
gauss_rand
gauss_rand(m,s)
Return a random number drawn from a gaussian distribution with mean m and standard deviation s.
Sample_without_replacement
class Sample_without_replacement(items)
Class for randomly sampling elements from list items without replacement. When all items have been sampled the sampling begins again with the full list.
Methods:
Sample_without_replacement.next() Get the next sample.
Example usage:
my_sampler = Sample_without_replacement(['a','b','c']) # Instantiate with list ['a','b','c']

next_sample = my_sampler.next() # Get the next sample.
Math functions and classes.
The MicroPython math module provides many math functions:
import math

math.log(x) # Return the natural logarithm of x

math.sin(x) # Return the sine of x
The pyControl.utility module provides the following additional maths functions and classes:
mean
mean(x)
Return the mean value of x.
Exp_mov_ave
class Exp_mov_ave(tau, init_value=0)
Class for calculating exponential moving average with specified time constant tau and initial value init_value.
Methods:
Exp_mov_ave.update(sample) Update the moving average with a new sample.
Atributes:
Exp_mov_ave.value The current value of the moving average.
Example usage:
# Initiaise a moving average object with time constant of 8 samples and initial value of 0.5
my_average = Exp_mov_ave(tau=8, init_value=0.5)

my_average.update(sample)  # Update the average with a new sample.

current_value = my_average.value  # Get the current value.